The schematics, page 1 and 3.
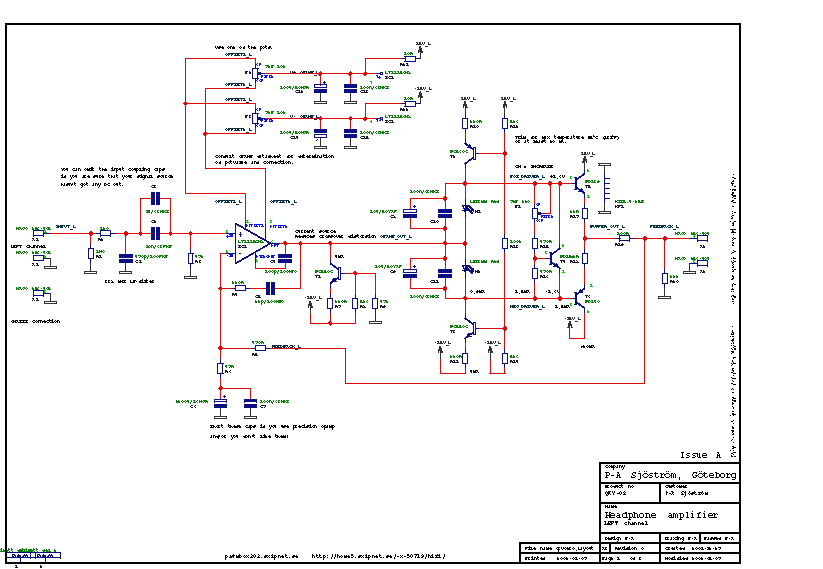
Click on the picture to get a larger view. The picture shows the schematics of the amp. Of course you can't use it for anything except for an overview. Please download the pdf-file instead if you want to see the details.
The main part
The main part is an operational amplifier, IC1. The opamp is followed by a buffer capable of up to 1 A which will be sufficient for all headphones on the market. In between the opamp and the buffer I have put a class A circuit, T1, R8, R9 and H3. This circuit was an experiment and is most effective when the load at the output of the opamp is small, not in this case. This circuit here is not very effective, don't use it, is my recommendation. You can take advantage of the circuit if you make the buffer different, maybe with MOSFET's.
Frequency compensation
R4, C5 is for frequency compensation. C4 is only for LT1028/LT1115!!
Offset trimming
P2, P3 are only used if you don't use a precision opamp. Weather P2 or P3 should be used, consult the datasheet of the opamp. Avoid these offset trimming pots. If you use them you will get worse temperature characteristics and worse power supply rejection. The later may not be so important.
The gain
The total gain is determined by R6 and R7. Gain = R6/R7 + 1. Low values of these resistors is important if you want low noise. Frequency compensation is achieved by R4 and C5.
Multiple feedback
R5 is an option for multiple feedback. Those who know what that is can expemeriment with R5, R4 and a jumper wire in C5. I havn't tested this and it's unsupported from my side.
Output current limitation
R19 isn't necessary but this resistor creates current limitation which means that both low impedance och high impedance headphones can be connected. Without this resistor it's very easy to damage low impedance headphones but if you have full control over the situation, omit this resistor. I should mention that many headphones are designed to be driven from a certain source impedance. Some people claim that this impedance is 120 ohms. Test this if you want to optimize the listening experience.
The input filter
The input filter is very universal. You should have a lowpass filter, R2 and C1, but if you don't have any RFI trouble at all, it's not necessary, just replace the R2 with a jumper and omit C2. DC blocking capacitor may be necessary but check with your signal source first. The whole amp is DC connected so you must ensure that you haven't got any DC in your signal.
Set class A level
If you don't want to trim the idle current you can omit P1, R15, R16 and T4. The LED's creates sufficient idle current of T5 and T6. If you want more current in an easy way, change colour of the LED's! If you have T4 mounted you can either have or loose the LED's. If you do have the LED's you will get a limitation of max bias current.
The output transistors
The output transistors must be insulated from the heatsink, see picture (not published yet, in the meantime, drop me a note.
The schematics, page 2
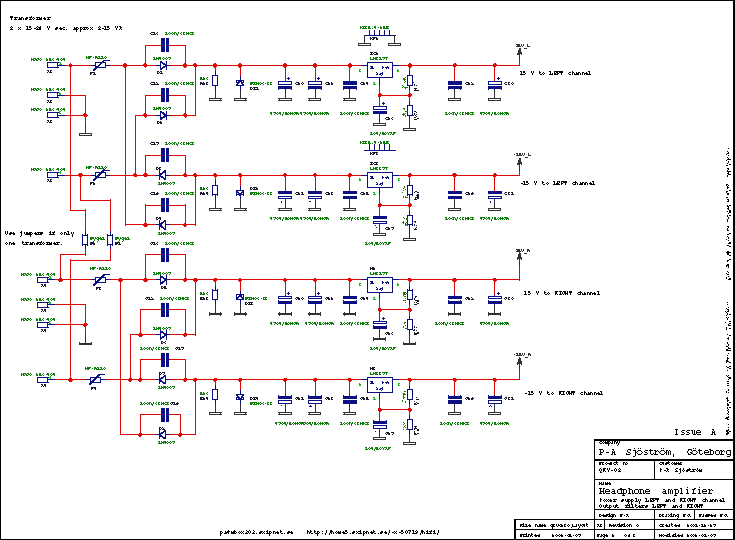
Click on the picture to get a larger view. The picture shows the schematics of the amp. Of course you can't use it for anything except for an overview. Please download the pdf-file instead if you want to see the details.
The power supply
The power supply is not very exotic, rather straight forward. It's designed to use two transformers but it's possible to use one only, just use the jumpers B1 and B2.
The regulators have heatsinks but in light duty and/or with low supply voltage, they aren't really necessary. You must insulate the regulators from the heatsinks.
R23, R24 are bleeder resistors. The regulators won't discharge the capacitors completely when the have reached the voltage of 0,6 V. The resistor creates a clean start at power up.
DZ1 is for transient protection, not necessary if you don't have problems of this nature.
F1 is a PTC fuse, lasts "forever".
